Friday 29 July 2016

SDC253 - Beach or Sea

SDC253- Beach or Sea
 
Soooooo, it's been a long few days.
 The girls are at home for six weeks solid as the summer holidays are well under way and already they are bored!
 
Moving swiftly on the new challenge over at Stampotique was set, beach  or sea! This is what the team at Stampotique had to say.
 
"The beach is always such a fun and relaxing place to be. Whether its sun or just fun in the sand and surf, lets see your best beach themed projects this week".
 
With this in mind my project is a sort of "tile" I guess, my inspiration being a sandy beach.
What do you find lots of on a beach?
Sand, pebbles and shells so I've made a mini sand sculpture. (Just in case you can't tell).


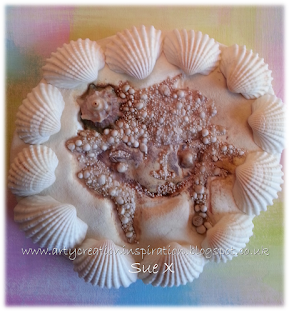
 I began by rolling a ball of paper clay and flattening it into a circular  shape with a brayer to provide a nice flat surface to stamp my head into.
Prior to stamping I used an anti static power bag to dry the surface of the stamp and ensure an easier release.
 
 
This is what my sand sculpture should resemble (ish).
A shell was added and pressed into the paper clay image while still damp then left to dry out.  A layer of texture powder was added all over using soft gel medium on the tile to create a sandy effect followed by various sized art stones infilling the stamped area to create the hair and other features.
 
Distress re-inkers added shading and tones of brown (sandiness).
Its actually a lot darker in real life. More shells were added around the rim of the tile.
There you have it something a little different and well, odd, I may revisit it and do a little more but for now I'm out of time and energy.
 
 For lots more inspiration hop on over to the Stampotique blog here and also check out the great new stamps available.
 
 Sue X

Saturday 16 July 2016

SDC252 - Party

SDC252 - Party 
 

It's all change over at Stampotique, a new design team and a replacement fortnightly challenge which you can enter twice, hopefully I can manage at least one entry.
 
I decided on a journal page which I've called, "Party Animals".
 
The page was inspired by an unfinished, ink sprayed page which I came across while deciding where to use some leftover texture paste. It's  colours were bold and party like and had masked images and text which I knew I wanted to use.
 
 
While waiting for the paste to dry I stamped multiple dogs and party hats onto watercolour paper. These were cut out and coloured with distress ink (as a watercolour).
 
Some of the hats were turned upside down to create bunting.
 
The top edge of a paper pad had also been sprayed and I decided to use this as a grounding for my dogs, a title was added along with a black smudged outline to make the dogs stand out.
 
The page was assembled and my Party Animals page was complete.
 
A few close ups.


I hope you like it.
 
 Hop on over to the Stampotique blog to see loads of inspiration and ideas from the new design team.
 

Sue X

Friday 15 July 2016

Washed Up (Not)

Washed Up (Not)!

A little while ago I made a canvas called Washed up! I needed to do another, the same but different.

My sister in law, Nola,  meets up with a group of ladies on a Sunday morning once a month and I managed to get an invite on the condition I take something for them to do, lol, I'm in demand.

 I have a few canvas's' around the house as I buy them in bulk so all I had to do was put a few extra bits and pieces, shells, etc together. We pretty much followed what I  had done  on that post, go here if you would like to read about it.

Anyhow, I went along part of the way with them and then took another path, adding a flowers instead (sorry Rebecca) to make a canvas card, a card and gift in one. 
 Attach a card blank to the back of a box canvas and hey presto canvas card.
 
 Here is my finished project.

 
And a close up.


Sue X

Thursday 14 July 2016

Washed Up!

Washed Up

A few days ago (its now been a couple of weeks, I'm a tad behind with posting) I cut open a canvas, wanting to create an explosion of something erupting out of the centre.
Very rarely does my artwork replicate what I image and this was one such piece
 
My working mind set changed and went in a different direction this is how it ended up.
 

Being summer (we'll sort of) I decided on a sandy, almost beach like theme. Having  purchased art stones from various companies I thought it would be a good idea to blow the dust off them and include them on a project.
As I said I cut into the canvas 6x6" distress the edges then folded them  down gluing them in position. Grey board was used to create the inner platform on which to build  the piece.

 
This was all painted with white gesso ( I stayed away from black for a change) art stones were added at the corners and then I went about finding embellishments 'n' bits to decorate the piece.

 
After hunting down a few things I pulled apart a piece of cheese cloth and lay it in the opening I thought it could resemble fishing net. A length of sisal type shredded rope was twisted around a piece of wire and twisted even more to replicate an old worn out bit of you guessed it, rope.
This was placed on the top of the cheese cloth both of which were glued into position.
Texture paste was added to the area surrounding the torn canvas and work began on the inside while it was drying.
A miniature bottle was filed with beads, a paper clay frame was cut and added along with a few shells and metal embellishments these were stuck into position.  Massive art stones from powertex, medium and small prima art stones were added around the items to give the impression of treasures half buried in sand an washed up on a beach.  The piece was given a coat of white gesso (not the bottle) to make an even base coat.
 
Once this was all dry Lindys sprays added the colours sort of sea, sand beach like.
Treasure gold added a few zingy highlights along with more touches of white gesso.
Blue beads added at the last moment to give a watery impression. Oh A few more small shells too just to finish off.


Here are a few close ups.


Hope you like it.


Sue X

Tuesday 12 July 2016

Tuesday Fun

Tuesday Fun
 
It's Tuesday again, less than two weeks and the girls will be at home for six weeks solid.

This will be my last official crafting Tuesday with sister-in-law Nola for seven to eight weeks, even then I'm not sure when we'll be able to squeeze in a session as hopefully we will have the builder's in.
Now, I would like to say I'm having  a lovely huge craft room built but alas no!  We are going over the garage to add a bedroom for Georgie, she has the box room and if her feet grow anymore she will not get in there. (Sorry G).  We are also having an extra bathroom, two girls one bathroom need I say more.

Anyhow this is what we made today!

This one is mine.


This one is Nola's.

 
I'm sure you'll agree they are both fab and who would have thought they began life like this.
 
 
A paperback book had the cover removed and was divided into two sections.
 
The book halves then had an aperture cut into them,  the edges were glued together and held tightly with bull dog clips until set. (greaseproof paper  was placed between the clip and book so
as not to damage the pages).
 
Both clear gesso and white gesso was added to the pages so that part became translucent and part was semi translucent.
Sorry no photos got carried away with making it.
 
Next we added texture paste with a variety of mediums mixed in (fine art stones, infusions powders)  through a couple of masks.
The edges were inked along with the centre of the aperture with brown distress ink then misted with water and lifted off almost immediately to reveal a mottled effect.
The bird cage and birds were heat embossed with white embossing powder.
Wire was twisted to form the tree branch, using 3d medium this was glued into position. Green moss was added  to create the foliage along with a few small flowers to give the impression of blossom.
The birdcage had a piece of thread attached to the top and this was glued onto the project to give the look of a hanging cage,  the birds were glued into position and the project was complete.
 
 
Not bad for a spur of the moment project.
 
Sue X